"Walk on a rainbow trail; walk on a trail of song, and all about you will be beauty. There is a way out of every dark mist, over a rainbow trail."
-Robert Motherwell
I was browsing through the internet for nail art inspirations, and I saw that geometric prints are trending. I thought I'll try making my own version.
This is what I came up with:
Geometric Nails
For this design, I used three thin coats of Dazzle Dry's Linen Lace. It is the perfect white for this design. The yellow undertones gave it a little warmth while still looking clean and crisp. Of course, I used my Dazzle Dry Trinity kit (nail prep, base and top coat) with this design.
After painting my nails with Linen Lace, I used a striping brush dipped in black acrylic paint to draw the divisions. Then with a detailing brush, I filled in random boxes with black, orange and blue acrylic paints. I went through the divisions again with my striping brush in the end to clean out any mistakes. Finally, a layer of top coat gave my nails smoothness and shine that made my nails look clean and professional!
Sounds easy, right? ;) Making straight lines can be tricky, though. From reading other blogs and watching Youtube videos, I learned that straight lines can be easier to do by keeping the painting hand relatively steady while rotating the finger you are painting on. That way you do not get crooked lines. Works for me!
Here are a couple more pictures of my work:
I am so in love with these nails! I actually want to try is with a beige and black combo. I think that will look uber classy!
For those who doubt their painting skills, I came across some blogs that suggest using tape to help in making crisp and clean lines. Click here for a couple of ideas from Magnolia Magazine.
I have been indulging myself with my favorite brand's latest collection, Dazzle Dry's Glitters Xtreme, this week, and now I finally get to my favorite among the three, Cold as Ice!!
Cold as Ice is an ultra-loaded glitter lacquer. It has fine, round, and irregularly shaped translucent glitters suspended in a clear, thick, jelly base that keeps all the glitters from sinking to the bottom of the bottle.
If I were to describe it in a word, I would say Cold as Ice looks magical. I suppose the glitters will be called white by most people, but I see them as little pieces of magic that reflect light and turn into blue, green, purple, pink... Every color of the rainbow!
Let me show you a close up shot:
Dazzle Dry's Cold as Ice
As you can see, Cold as Ice lends itself more on the lighter shades on blue, green and purple, which is probably why I love it so much! I am a girly girl, and this is the ultimate glitter polish for me.
In the picture above, I painted a single layer of Cold as Ice on my bare thumb. Can you believe how covered my thumb looks already? Added to that, the thick jelly base is not difficult to apply at all. Very smooth and manageable. :)
To experiment with Cold as ice, I chose four very different colors. I wanted to see how this beautiful glitter lacquer could transform all of them.
Here are my picks:
Dazzle Dry's Midnight Express, Polar Jade, Blueberry Snocone and Timeless
Now let us see them with Cold as Ice layered over them:
Look at that transformation!! Midnight Express now looks galactic. It reminds me of satellite pictures of how the galaxy looks like. On Polar Jade, it surprisingly turned into translucent gold flecks, which I did not even see in the bottle to begin with! Blueberry SnoCone became a rich, textured, super striking blue. And well, Timeless... Oh, how breathless it left me!! It looked crystalline! In the picture you see how it looks like those trending texture nail polish, but definitely without the rough texture. Too beautiful to be true!
Again, let us look at the with and without pictures side by side:
I just can't stop loving it!! As I've said, it is my ultimate glitter polish. And judging from the results of my little experiment, Cold as Ice easily blends with different shades, and is not only for the feminine and dainty. :)
To read about the other colors in this collection, click here:
I am so excited to share with you all the colors from Dazzle Dry's newest collection, Glitters Xtreme!
Today I will be featuring the second color from their collection: Gold Digger!
As the name suggests, your nails will look like they were covered by gold dust after digging for gold with this polish on them. Looking closely at Gold Digger, you will see that it actually has fine gold glitter and chunkier gold suspended in its clear jelly base.
Let me show you a picture:
Gold Digger from Dazzle Dry's Glitters Xtreme
As you can see in the picture, the bigger gold glitter reflects light and turns into blue, pink, purple, green... Some pieces even look like they have a rainbow on them! I applied it on my bare thumb nail just to show the texture. This picture shows only one coat of Gold Digger. See how loaded it is?? Amazing!
Dazzle Dry has definitely gone creative in coming up with this glitter, and I think we, as consumers, should likewise be creative with it! I do think glitter polishes are best over other colors rather than plain nails, so I picked out four different colors to use Gold Digger with. Definitely not sticking with just gold for this! Here are my picks:
Dazzle Dry's Bedazzled, Happy Hour, Tropical Sunset, and Oasis
I picked Bedazzled for the more conservative ones out there who think glitter lacquers should always match their base color. As for the others, I just went with my gut. Happy Hour is a rich red with gold shimmer, so I think that made sense. Tropical Sunset and Oasis look like they will complement the color reflections on Gold Digger as well.
So let's see how my experiment turned out:
Tadaaa! Beautiful!! Bedazzled turned into gold with attitude. Happy Hour became happier hour! And I couldn't even begin to describe Tropical Sunset and Oasis -- they're just too lovely. I can imagine being the star on the beach with Tropical Sunset layered with Gold Digger, actually. And Oasis layered with the glitter polish just looks so calm and elegant at the same time.
My personal favorite in this batch is Oasis with Gold Digger. Will definitely wear all my nails with this combo some time soon!
Now let us look at the pictures with and without Gold Digger side by side:
Gold Digger definitely transforms colors!! It is also so amazingly full of glitters that all I needed was one coat. :)
For those wondering about consistency, the glitters are suspended in a thick jelly base. Definitely easy to use! The jelly base also keeps the glitters from sinking to the bottom, unlike other glitter lacquers I've used.
So that's it for Gold Digger! Definitely a keeper!
Do check out my review on Caught Red Handed, and stay tuned for an upcoming review on the last color in the collection, Cold As Ice.
Oops! I got caught red handed this week... Doing my nails, that is!
My favorite brand, Dazzle Dry, has come up with their Glitters Xtreme collection! The collection features three super loaded glitter lacquers, namely Caught Red Handed, Gold Digger, and Cold as Ice. I'm definitely loving their names almost as much as I love the glitters themselves!
For this post I am featuring Caught Red Handed. Looking closely at the bottle, I realized that Caught Red handed has three kinds of glitters suspended in a clear jelly base: fine red glitter, chunkier red glitter, and randomly shaped glitter that shines into different colors. Depending on the light, I saw purple, blue and gold flecks. It indulges my love for glitter so much that I feel like it's almost naughty to use it! No wonder Dazzle Dry decided to name it as such :p
The picture above is a close up shot of the bottle with my thumb painted with just Caught Red Handed. Of course, I do not suggest wearing it over your bare nails -- holos are not to be used that way. But for reviewing purposes, I thought this shot might be helpful. Take a close look at the bottle and you will see the different kinds glitters I am talking about.
What is also amazing about Glitters Xtreme by Dazzle Dry is that the glitters, though chunky as they are, do not sink to the bottom of the bottle. I think this is due to the fairly thick jelly base. But because it is a jelly base, the thickness does not make it difficult to use. Still spreadable like my favorite fruit jellies!
To give due credit to Caught Red Handed, I decided to swatch it over four different colors. Most people think red glitter only belongs with red polish. Well guess what, I found it goes with other colors too! For my experiment, these are the colors I chose:
Dazzle Dry's Midnight Express, Fast Track Cherry, Grape Lollipop, and Cherry Parfait
I know what some of you may be thinking: I'm probably one of the most baduy (Filipino slang for bad taste) people ever, thinking of combining purple and pink with red! That's what I thought, too. But the purple and fuchsia flecks in Caught Red Handed gave me the idea, and I thought it might be worth a try.
Here are the results after layering Caught Red Handed over my nails:
See?? Different looks over different colors! Over Midnight Express it looks like confetti, and Fast Track Cherry became texturized red indulgence. Grape Lollipop and Cherry Parfait turned into fun fearless and funky nails! For this trial my favorite was actually Grape Lollipop. Who would have thought? Red glitter over purple polish. I love surprises!
Let's take another look at them side by side:
Big difference, right?
Well, that's another great polish from Dazzle Dry. Stay tuned for my blogs on Gold Digger and Cold as Ice, coming up real soon :)
This post will be short and simple, just like my topic.
As a nail art enthusiast, white is an indispensable color. And I found that my favorite nail polish brand (actually the only one I use for base colors now), Dazzle Dry, has several shades of white. So I decided to make a comparison between the shades I have :)
Shades of white by Dazzle Dry
As you can see in the picture above, the shades of white are quite different to each other, even in their bottles. From this picture, you will see that White Lightning is the whitest, while Portia's Wit looks more beige. Linen Lace and French Quarters actually look alike in the picture, but let's see when applied on my fingers:
Dazzle Dry Whites
I think swatching really gives justice to all the colors.
In the second picture, White Lightning stands out as the whitest white. This has the thickest consistency among all four colors, but still remains easy to use. Two coats was all I needed to get full coverage.
Portia's Wit, on the other hand, is an off-white with beige undertones. Consistency is just right for me. Not too thick as to make application difficult, but thick enough to give an opaque coverage. I used three thin coats. An off-white color is useful for times that you need a less striking white (like on French Manicures).
Linen Lace is also an off-white, but this time with yellow undertones. Consistency is just like Portia's Wit -- perfect for an opaque polish. I would say Linen Lace is as elegant as Portia's Wit, but your choice would depend on your skin tone or what you will use it for. I like both because I am a fan of light polish.
Lastly, Frech Quarters is an extremely sheer pearlescent white. I had to use three thick coats for the picture. I wore this plain once before, and my darling students said my nails looked like pearls. This one is definitely for the feminine and dainty ladies out there.
Among the four, the one I have used the most is White Lightning because I do nail art. But as for my favorite.. Well, that's a tough choice. I love them all, and find all of them quite flattering. I am no expert on skin tones, so I suggest looking for skin tone and color tips if you can't decide what white will look best on you. :)
A short disclaimer before I begin: This is this year's Valentine entry, and might be mushier than some of you may stomach :)
This is my 5th Valentine's with my special someone. It feels great. We are relaxed around each other, and we can just sit together in the same room doing our own thing without having to be mushy all the time. In a way I'd say we are like an old couple, completely comfortable in the way we have grown together.
So for Valentine's this year, I decided to paint on my nails a couple which to me looks like an old married couple: Mr. and Mrs. Potato Head.
Mr and Mrs Potato Head
For this design, I used two coats each of Frozen Lemonade and Manhattan Mink, both from Dazzle Dry. I then used a detailing brush and acrylic paints to design the nails.
Holding Frozen Lemonade
Frozen Lemonade is a very light yellow. I love the way it looks against my skin, actually. It looks fresh without being too bright. For this design, it was a toss-up between Frozen Lemonade and Sahara (also from DD), which is a brighter shade of yellow. I opted for Frozen Lemonade though, as bright yellow might be too much of a contrast with Manhattan Mink. It turned up to be a wise choice. Frozen Lemonade is the perfect compliment to the rich brown that is Manhattan Mink.
Frozen Lemonade can be quite difficult to apply though. As you can see from the pictures, I wasn't able to bring the edges near my cuticles. Whenever I go too near, I ended up with messy looking edges. I think I need more practice in painting my nails. Nonetheless, all the effort was worth it because Frozen Lemonade is my perfect shade of yellow.
Holding Manhattan Mink
For Mr. and Mrs. Potato head, there was no question in my mind that Manhattan Mink was the shade I needed. It is a creamy milk chocolate brown that surprisingly goes on very smooth. No, it does not just go on your nails -- it glides. It goes on thin, but it is surprisingly opaque. I had full coverage with two coats.
I was actually hesitant when I first saw Manhattan Mink. I've never worn polish of this shade before. But I fell in love the moment I applied it. In fact, I am definitely going to wear my nails plain with this color one of these days. So classy and effortlessly chic!
As for me and my special someone, we ended up having steak night with truffle pasta at home while watching our favorite TV series of the moment... And I have to say, it was one of the best Valentine dinners I've ever had. Relaxed, unpretentious, and definitely filled with love.
As I mentioned in my review on Dazzle Dry's Strawberry Macaron, the color made me feel like a fairytale princess because of its perfect shade of pink. And because it is Valentine's season, I thought it would be nice to use the color for creating a Valentine Princess nail art.
Here is what I came up with:
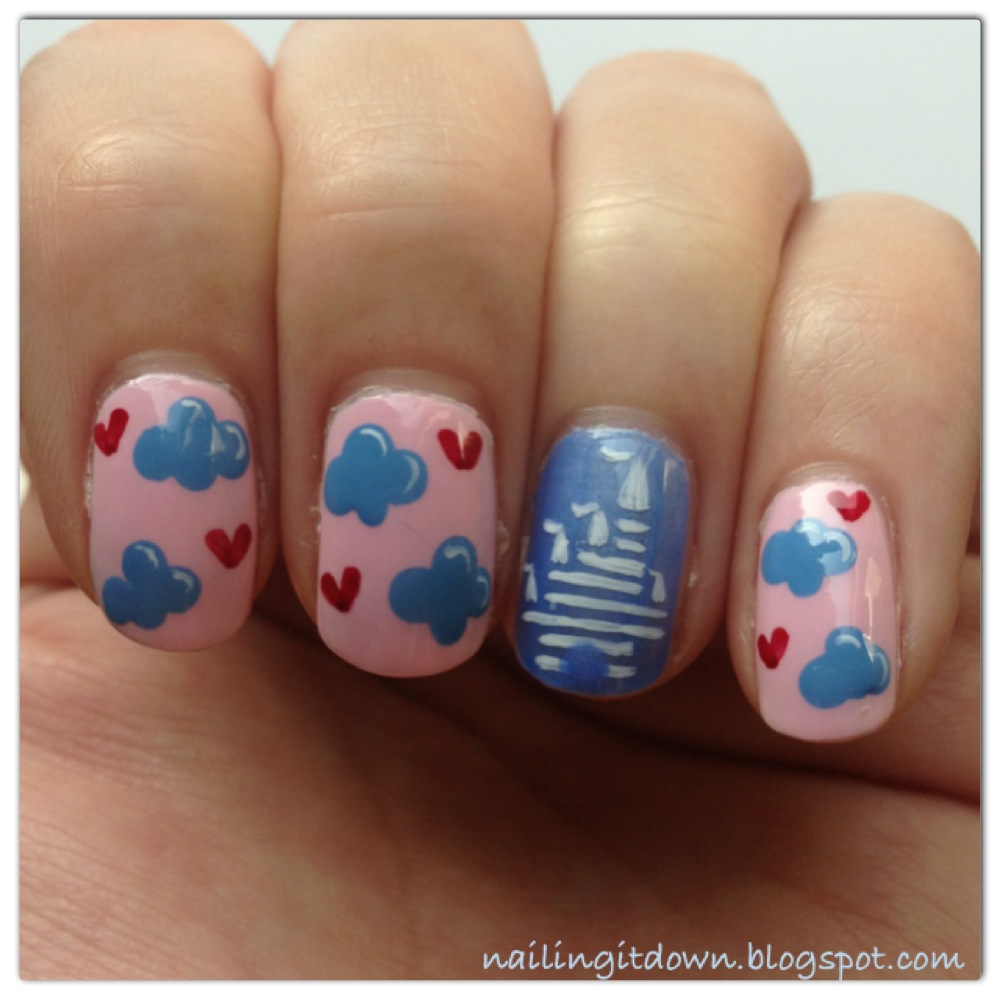
Valentine Princess nails using Strawberry Macaron by Dazzle Dry
To create the design, I used 3 coats of Strawberry Macaron, and also 3 coats of Aegean Cruise (also from Dazzle Dry). The clouds were made using Orly's Snocone, while the hearts and castle were painted using acrylic paints.
I actually got inspiration for the castle from one of my favorite nail artists, Cutepolish. Here is her video:
I found that painting the castle was much harder than Cutepolish made it look in the video! It took me several tries to get it right. It was so frustrating that I almost gave up and was planning to just stamp my accent finger with stars. But perseverance eventually paid off. I wouldn't say my castle is as perfect, but this should do for now :)
I am actually quite happy with this design. It looks so dreamy, and even reminds me of pajama prints. I also think it's just apt for the season. After all, Valentine's is the time when a lot of girls feel like princesses smitten by their Prince Charmings. I know I do. <3
And now I end this post the way I started it, with a song.
"No matter how your heart is beating, if you keep on believing, a dream that you wish will come true."
I have always been a girly girl, and just like most girly girls, I adore pink! And I'd like to think pink loves me back just as much ;) I was therefore ecstatic when I heard that my favorite polish brand, Dazzle Dry, has come up with a pink shade as part of their 2013 Spring collection, Afternoon Tea.
Afternoon Tea by Dazzle Dry features four creamy colors namely Petit Four (a soft peachy shade), Forget Me Not (a calming Tiffany blue), Spearmint Tea (a cool blend of blue-green leaning on blue), and Strawberry Macaron (a lovely pastel pink).
I couldn't wait to try on Strawberry Macaron as soon as I got hold of it, and here is how it looks like:
Strawberry Macaron by Dazzle Dry
Strawberry Macaron is a creamy opaque pink. It goes on very smooth, which makes application really easy. I am wearing three medium-thick coats in the picture as the polish goes on thin.
When I first held the bottle of Strawberry Macaron, I had to tell myself, "This is the perfect shade of pink I have been waiting for all my life!" And I did not feel disappointed when I used it. It was just right -- not too bright and not too pale.
Wearing Strawberry Macaron actually made me feel like a fairytale princess because of the perfect shade of pink. I say Strawberry Macaron would be my go-to color now for times that I want a pale, but not a nude, pink.
I think this is my _th bottle of pink from Dazzle Dry... But then again, I don't think I can ever have enough pink!!
For those who want to know about the other shades included in Afternoon Tea, please read premier nail artist Rina Alcantara's blog here.
Unlike most girls who enjoyed nail polish since the age of 5, I only discovered the fun of using nail lacquers over the summer of 2011. I was already in my 20's then. This was not to say I've never used nail polish my whole life, but it was only then that I bought my own bottle of nail polish and tried applying it myself. This was odd for such a kikay girl like me, but I have always been warned by my mother that nail polish will ruin my nails and so I stayed away from it. But I suppose boredom over the summer break took over my sanity, and so I bought my first bottle of nail polish which quickly got me hooked.
And guess what. My mother was right. After constant use of nail polish, see what had become of my nails:
As you can see, my nails were disgustingly yellow. It actually looked like I was constantly eating cheese-flavored snacks that have stained my nails. Look closely and you would even see chips on the tip of my pinky nail. It was so embarrassingly yellow that I felt like I always had to hide it with nail polish. I had mixed feelings about wearing nail polish -- I loved doing my nails, and even more so when I do nail art. But at the same time, I felt bad that my natural nails looked so awful. And more than that, I was scared of other factors about my health that I may not be seeing yet. If my nails are turning yellow and ugly, what's happening to the rest of me everytime I use all these chemicals for the sake of fashion??? I wasn't sure it was worth it.
Then the best thing happened in August-September of 2012. As I was browsing through Facebook, I chanced upon an announcement for a nail art contest hosted by Dazzle Dry Philippines. The company claims that they are the only vegan nail polish system that dries rock hard in 5 minutes. They also say the products are non-yellowing, nail hardening, and hypoallergenic. At that point I was pretty sure it was all a marketing scheme, but how bad can joining a nail art contest be? I've never joined one, and I paint my nail regularly anyway, so might as well join, right? So I did. And I placed second!!
That was the first time I received my first Dazzle Dry Trinity Set (nail prep, base and top coat) and lacquers. It was simply amazing. The drying time was nothing I have ever seen. The first hand would always be completely dry after I finish applying on the second hand. And that happens with every coat I do. Even if they were lying about the health benefits of their products, I was already sold just with the drying time and shine of their products.
Check out their video:
I was so happy with Dazzle Dry that I continued buying their products after the initial ones that I won in the contest. Let me show you some of my creations with Dazzle Dry:
*Click on the link below them to read my blog on the art :)
Dazzle Dry made nail art a hundred fold easier because they dried so fast! With Dazzle Dry, I never had to worry about damaging my painted nails with accidental touching. It also cut my painting time which allowed me to do other things right after doing nail art. It was such a blessing.
The blessings don't stop there, however. After some time of using Dazzle Dry, I noticed my nails getting more and more pink. The yellowing just grew out, and the new nail growth never ever turned yellow again. See my nails now:
My healthy pink nails
In the picture above I am simply wearing Dazzle Dry base and top coat. No lacquers to cover my natural nails. I'd wear them bare, actually, but I read that keeping a thin coat of clear polish on the nails keeps them from chipping. And what better polish to use for that purpose than Dazzle Dry?
Let me show you my nails before and after side by side:
My nails before and after Dazzle Dry
The picture above shows before and after pictures of my nails, with 5 months of continuous use of Dazzle Dry. Take note, nails take 4-6 months to grow from base to tip. I would have waited about this long anyway to get rid of the yellow parts, but at least I still got to paint my nails while growing it out.
I am not in anyway a paid endorser of Dazzle Dry, but I am sure one happy customer! Thank you, Dazzle Dry, for proving that fashion does not always come with a price.