"Walk on a rainbow trail; walk on a trail of song, and all about you will be beauty. There is a way out of every dark mist, over a rainbow trail."
-Robert Motherwell
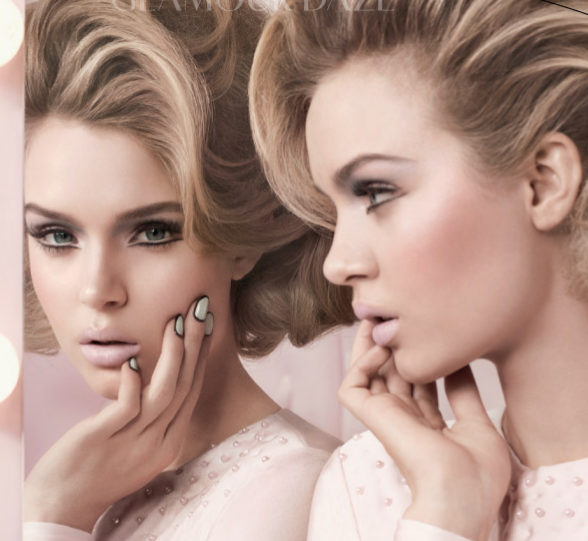
I was walking in a mall one time when the MAC poster in the department store caught my eye. I loved the look! It was basically black and nude, and the model was sporting a very high-fashion manicure. I didn't know what it was called then, so I searched "nails with frame manicure" on Google. I later on found out that this look is called Border Nails, and has been in fashion in the US since August of 2012. Below is a picture of MAC's poster that I fell in love with:
Picture taken from http://www.jamegackie.com/2012/10/simple-nail-trends-101.html
I immediately got intrigued and wanted to try this new manicure, so I searched tutorials on it. The tutorials I found basically instructed to paint the nails with the central color before drawing on the borders, then cleaning off the excess from outside the nails. I hate cleaning up though since I find it hard to get a really polished and clean look around the edges, so I tried this other technique that I will share with you. It's so easy you won't even need any tools!!
Ready? Let's go!
Materials:
Nail Prep
Base Coat
Top Coat (Items 1-3 all from Dazzle Dry's Trinity Set)
2 opaque nail lacquers of choice (I used DD Blueberry Snocone and Cotton Candy)
Procedure:
After sanitizing with nail prep and applying top coat, paint all nails with your color for the borders.
Leaving a thin margin along the edges of the nails, paint on the central color. You may need 2--3 coats to get a really opaque quality.
Paint on a very fine French tip, about at thin as the margins.
Add top coat, and you're done!!
Let's take a look at more shots of my first attempt on Border Nails:
Holding my 2 color choices: Cotton Candy and Blueberry Snocone, bothe from Dazzle Dry
I was so happy with how my Border Nails turned out that I tried them in nude and black, just like in the MAC poster. For this look I used Joan's Armor, a very dark pewter grey that almost looks like black, and my favorite, Girlishly Giddy, both from Dazzle Dry too :)
Nude (DD Girlishly Giddy) + Very Dark Pewter Grey (DD Joan's Armor)
While doing it I realized it would look so much more sophisticated if the centers looked like lace, so I stamped them. Here is how they turned out:
In yellow light:
In sunlight:
This look is really easy. If you're used to applying polish and have quite a steady hand, this should be no problem.
Thanks for reading!!
Helpful Tips:
This look works best with contrasting colors. Pick lacquers of opaque consistency.
It may be tempting to apply a thick layer for the center right away - DO NOT do this! Having too much lacquer on the brush will make strokes difficult to control, and would also create a bumpy texture. Instead, layer on thin coats at a time. Might take longer, but slow and steady wins the race ;)
Be creative with this. You may switch up the colors of the borders and centers for the accent fingers, or have a different color altogether. :)
It's Thanksgiving!! Thanksgiving is not really celebrated in the Philippines, but I thought I'd make a nail art inspired by the holiday anyway. Besides, with having work that I love (teaching), a hobby that keeps me inspired (nail art), family, and great friends, I feel I have so much to be thankful for.
I am fond of making cute cartoon animals on my nails, so I thought painting a turkey would be great. Here is what I came up with:
Turkey Nails for Thanksgiving
Cute, isn't it?? It actually turned out better than I hoped it would :) So let's begin with the tutorial!
Materials:
Nail Prep
Base Coat
Top Coat (Items 1-3 all from Dazzle Dry's Trinity Set)
Nail polish in light blue green (DD Casablanca)
Acrylic Paint
Paint brushes (better if you have nail art brushes)
Nail polish in black and white (The Face Shop or you may also use acrylic paint for this)
Dotting tools
Procedure:
After sanitizing nails with nail prep and applying base coat, paint all nails with light blue green.
Start making the feathers by making a fan-like outline using peach acrylic paint.
Fill in the fans with peach paint, then add red details like so.
Outline the turkey tails with dark brown paint.
For the turkey, I made a big brown oval first using a fatter brush. I then added the tails following the same method shown above. Eyes were dotted on with nail polish and dotting tools, and other details are painted on. *Sorry I don't have step-by-step pics for this, was rushing to finish! :(
Apply 2 layers of top coat. See the difference after top coat? Works like magic!
This nail art is so adorable it makes me feel sorry for all the turkeys that are about to be devoured in the coming days!!
Let's take another look at the finished design from a different lighting before proceeding to some helpful tips:
Turkey nails by nailingitdown.blogspot.com
Helpful Tips:
When painting thin details like outlines, dip only the tip of the brush in the paint. Thant way, lines go on thinner.
I used peach for the tails because I wanted a touch of pink in my art (pink being the most flattering to my skin tone). I imagine beige would also look nice :)
If you are using Dazzle Dry like me, it would be better to top coat before painting with acrylic. Acrylic paint is erasable with alcohol, and without the top coat the lacquer finish gets ruined by the alcohol.
Thank you for reading!! Happy Thanksgiving to all!!!
I recently attended a friend's wedding, and so my nails had to be dressed accordingly. And what better theme to have than jewels and lace??
My nails were not literally adorned with jewels and lace though. I called my art "Jewels and Lace" because I used Emerald Jewel Effects and Silver Lace Texture, both from Dazzle Dry (my current favorite brand). Their Jewel Effects line features a series of clear lacquer base with jewel-colored glitters, while the Lace Texture line is their version of cracking polish. Here is my design using Dazzle Dry's Jewel Effects and Lace Texture:
Jewels and Lace nail art
As you can see, the Lace Texture at the bottom part of the nails have very fine cracks. This is because I chose it to be that way by applying a very thin coat. Thicker coats produce chunkier and edgier-looking cracks. Because I was going for a more delicate and formal nail design, I thought a finer texture would look better (and I say it did!).
*If you have texture coats of other brands, I think they also perform the same way. I've tried a few others like OPI, Nicole by OPI, and The Face Shop, and they all work the same. I just personally prefer Dazzle Dry because all of their products are vegan :)
So let us now proceed with the tutorial proper!
Materials:
Nail Prep
Base Coat
Top Coat (items 1-3 all from the Dazzle Dry Trinity set)
Dark green polish (DD Polar Jade)
Green glitter polish (DD Emerald Jewel Effects)
Silver or pearly white texture coat (DD Silver Lace Texture)
Silver Striping tape
Regular sticky tape
Procedure:
After sanitizing nails with nail prep and applying base coat, paint all nails with green polish. This picture shows 2 coats of DD Polar Jade without top coat yet.
Apply 1-2 coats of glitter polish. I've applied top coat in this step because the proper way of using DD Lace Texture is to use top coat before and after the application of Lace Texture.
Position regular tape diagonally on the nail and swipe texture coat on the nail. You may choose to apply it downwards or diagonally to achieve the desired look. I chose to apply it diagonally.
Gently peel off the tape once the texture coat is dry.
Place silver striping tape to outline the texture coat.
As usual, apply top coat, and you're done!!
Helpful Tips:
You may want to apply an extra layer of top coat when using striper tape to reinforce it.
Be sure that striper tape lays flat on the nail before applying top coat.
When swiping the texture coat across the nail, keep the hand with the brush steady, and instead turn the nail you're painting slowly. This helps keep strokes more even.
Note that I am using Dazzle Dry out of my personal preference, and not because I am endorsing it! Of course, you may use other brands to recreate this look :)
I am a big fan of animated films, and the latest that I have seen is Wreck It Ralph by Disney. It is the story of Ralph, the villain whose role is to wreck the building in his game. Feeling unappreciated and shun by the other characters he lives with, Ralph travels to other games in the arcade in search for a golden medal that would prove that he can be a hero too. In his quest, he meets Vanellope Von Schweetz, an outcast in her own world (Sugar Rush) also seeking acceptance. For those who have not seen the movie, I thought a trailer might help you understand what I'm talking about.
I enjoyed this movie immensely, and so wanted to make a nail art out of it. Here is the design I came up with.
Wreck It Ralph and Vanellope Von Schweetz with assorted sweets from Vanellope's game, Sugar Rush
You might be wondering why my version of Ralph and Vanellope do not exactly look like them. When I was planning this art, I figured it would be difficult to draw them and do them justice, so I searched for easier images of the characters. I chanced upon this picture of Wreck It Ralph toys, and based my art on these toy figures instead.
I also ended up changing my mind last minute on the candy on my middle finger. I originally painted a peppermint, but seeing that my art lacked color contrast, I erased it and painted a candy corn in its place. I will explain how to make both just for options :)
Materials
Nail Prep
Base Coat
Top Coat (I use Dazzle Dry for all three items)
Nail polish in: white (DD White Lightning), pink (DD Cotton Candy), blue green (DD Casablanca), sheer white pearl (Bobbie Engagement - only if you want a peppermint), green glitter (The Face Shop), orange (DD Tropical Sunset - if you want a candy corn)
Acrylic paint
Thin paint brush
Dotting tool
Toothpick
Nail decals (optional)
Procedure:
After cleaning nails with nail prep and applying base coat, paint the thumb, middle and ring fingers white, index finger pink, and pinky blue green. Paint the middle finger orange if you want a candy corn.
Top the pinky with glitter polish.
For those opting to make a peppermint, apply sheer pearl white polish on the middle finger.
Use a thin paint brush to make diagonal brown stripes on the pinky. This creates a choco-mint bonbon!
Using the same brush and brown paint, draw an outline of chocolate drizzle on the index finger.
Fill that in and add a chocolate drop underneath if you want :) I later on added some glittery sprinkles for extra fun!
To make a pinwheel for the peppermint, start with a dot right in the middle of the fingernail.
Starting from the dot, paint 5 to 6 curving lines going out. Of course, some additional glitter wouldn't hurt :)
I painted Vanellope by first painting her face and her hair using acrylic paint.
I then added her eyes, nose, and hair accessories.
Same goes for Ralph. Face and hair first.
Then the smaller details. You may use a dotting tool to make perfect circles for their eyes.
This is the finished look (without cleaning out the edges) with the peppermint nail.
Because I did not like the peppermint, I erased it. I then painted my middle finger orange then painted the white and yellow parts with acrylic paint.
Apply top coat, clean out the edges, and you're done!!
Another look at my Wreck It Ralph Nails. I added some nail decals above Ralph and some orange dots above Vanellope to add color.
Helpful Tips
When creating stripes, it is easier to hold the painting hand steady and slowly pivot the nail you're painting on. This method creates straighter lines.
Acrylic paint might look dull and not too smooth initially. Do not worry! A good top coat seals it and creates a smooth finish.
The sweets shone here are just my ideas. Try out your own favorite sweets!
Thank you so much for reading!
P.S. As of this writing, Wreck It Ralph is still showing in Manila. There's still time to catch it! :)
Halloween is over!! And so I thought something fun and festive was in order -- Paisley Print!!
Paisley Print nails
I actually found inspiration for this print a coloring page a student of mine was doing. She asked help from me to color the small details, and I had so much fun doing it I just wanted to recreate it on my nails! Of course, I couldn't paint details as fine as that coloring page, but I do hope this is good enough!
Materials:
Nail Prep
Base Coat
Top Coat (items 1-3 all from Dazzle Dry's Trinity Set)
Light pink nail polish (DD Girlishly Giddy)
Assorted nail polish of your choice
Acrylic paint
Permanent markers
Alcohol and cotton pads (for erasures)
Dotting tools
Toothpick
Procedure:
After applying nail prep and base coat, paint all nails pink. I also applied top coat at this step because I am using vegan nail polish which may be sensitive to alcohol.
Use permanent markers to draw your general paisley shapes.
Fill in the centers using acrylic paint. Erasures can only be done up to this point.
To make flowers: Using a dotting tool, make 5 dots like so.
Smudge in the dots to the center using a toothpick. Easy flowers!!
This is how my nails looked so far after putting on the flowers.
Now I used permanent markers again to draw inside the paisleys. I also added more flowers and random dots using nail polish.
Just keep dotting and drawing away until you are satisfied with your design :)
Of course, apply top coat again, and you're done!!
Helpful Tips:
Only permanent markers and acrylic paint are erasable with alcohol, so do those parts first before adding details using nail polish.
There is no exact science to creating a paisley pattern, so feel free!! Just dot away :)
I opted to only put one paisley on each nail, but of course more may be added. It's all a matter of preference.
Do not forget to apply top coat in the end to seal in the design.
This is my second Halloween nail art for 2012. I really wasn't planing on making two designs, but because inspiration hit me, I made this design while I was on vacation. Thus, this entry is way overdue because I had bad internet connection at the time I painted my nails. But as people always say, better late than never!
My Silly Pumpkin Nails
I had so much fun making this design. I actually did not paint on the faces - I drew them! While I was in a bookstore the other week, I saw a pack of colored OHP (overhead projector) markers. They had very fine tips and the label read "correctable and erasable with alcohol". I figured, since the markers can write on the glossy surface of acetate, there should be no reason for them not to be able to write on lacquered nails! I gave it a shot anyway, and see what I created with them! It made adding fine details so much easier :)
My very useful OHP markers
There's not much to this tutorial. It's basically paint your nails orange and draw! So easy :)
Materials:
Nail Prep
Base Coat
Top Coat (items 1-3 are all part of Dazzle Dry's Trinity Set)
Orange polish (DD Tropical Sunset)
OHP markers in black and green (permanent markers will work the same way)
Procedure:
After prepping and applying base coat, paint all nails orange. I applied topcoat before drawing because I am using vegan nail polish which may be more sensitive to alcohol than regular polish.
Draw on your left hand!
Draw on your right hand!
I told you it was so easy!! I drew the faces first, followed by the green tops, then finally the fine vertical lines.
Helpful Tips:
Keep a light hand when drawing, especially when doing the stripes. The heavier your hand, the thicker the lines are.
Keep some alcohol and cotton pads nearby for corrections.
It may be helpful to browse through the internet for ideas for the faces. You may even want to make some pumpkins look nasty!
Thanks for reading!! Sorry again for the delay on this one :)